Tuesday, August 23, 2011

Blogiversary!!

 Today marks one calendar year of blogging here on Keeping Up With The Kizziahs!! I have really enjoyed having an a place to share my thoughts on life, projects, and general ramblings of my oh-so-amusing life as a teacher. Thank you for all your wonderful comments and for reading this here old blog...you make a girl feel good :) 
In honor of the momentous occasion have I decided to re-cap the amazing year this blog has captured! Here's to another fantabulous year of blogging!!

{1} I survived a major eye infection and near blindness...okay I exaggerate...a little.  
{2} Recorded the Amazing and entertaining lives of our adorable pooches (here, here, here, here, and here
{3} Shared my favorite You Tube videos (see YouTube Tuesday)
{4} Learned all about Florida's unique insect population
{5} Began the massive task of turning a house into a home through various projects from headboards, to lamps, to new tiles in the kitchen (see Home renovation and decor)
{6} Decorated our casa for all the holiday seasons (fall, Halloween X2, & Christmas)
{7} Attempted my first furniture redo's (a sewing table, and a night stand)
{8} Shared with the blogging world all the non-English hilarious sayings of my husband (That's What He Said Label)
{9} Celebrated one year of wedded bliss to my favorite man!!
{10} Announced and tracked my first pregnancy with our little boy, Walters! 
Whew!! Seems like A-Lot happened this year!! Can't wait to see what next year holds when our family of 2 becomes a family of 3 :) Thanks for reading yall!!

Friday, August 5, 2011

Walters in 3D!!!

Today was one of the most exciting days of pregnancy thus far...our 3D/4D ultrasound!! We went to an amazing place called Discovery Ultrasound in Jacksonville. Allison, the owner and technician, was wonderful and I would HIGHLY recommend it to anyone! My mom and grandmother were even able to watch live from their computers at home.

I was first of all simply amazed at modern technology, and also beyond excited to have a glimpse at what our son will look like in a few months. Not to mention the fact that it was super exciting to have a mental picture of him in my mind in a non-alien form. Makes those side-splitting kicks worth while for sure!! We think he is just perfect and we can't wait to meet him more than ever!

Here's what we found out about our little man today...

{1} He is in a head-down position!! His feet are up under my right rib cage and head down and to the left. 

{2} He is no doubt Adam's child! Take a look at the face below...all his daddy! Especially those cheeks!!  Kind of unfair considering I'm doing all the work here people!

{3} He has a really strong heart beat...168 beats per minute!

{4} He's still a boy...once again no shyness from Walt!!

{5} He stays awake, ALOT!! The technician was amazed at how much he kept his eyes open. Hard to tell in the pictures below, but the little black slits on his eyes are actually them open. 

And here are some of the best shot of the day...
Here he is yawning!!

Look at those cheeks...just like Daddy!

Here is a front shot of his chest/sternum. He's still a little scrawny (except for the cheeks), but we're hoping he'll get a little meat on his bones in the next 3 months!

Sweet little sleepy face :)
 We can't wait to meet you baby Walters!! Your mommy and daddy love you very much!!

Thursday, August 4, 2011

A gift for my Sissy...

Recently my baby sister, who by the way is definitely not a baby any more which makes me feel sad and old,  sent me a picture of a necklace she liked to get my opinion. So I thought I would suprise her while she was out of town and replicate it for her for half the price :) See what ya think...

The Original...


My Replica...


Cost Break-Down:
Fabric for Rosettes (1/4 yard).............................................$1.50
Chain for Necklace (still plenty left for more creations) ..............$4.00
Clasps for necklace (pack of 90 pieces)...................................$4.00
Buttons for embellishment..................................................$5.00
Hot Glue gun + glue sticks...................................................free; already had

Total ...........................................................................$14.50

Not too shabby, especially considering I still have enough supplies to make a minimum of 5 more necklaces. All I would need are more embellishments! I pretty much love how it turned out!


Hope you LOVE it Annie Bananie!!

P.S. We need to remedy the fact that this is the only "recent" picture I have of you, and it's been over a year since this was taken :(


Wednesday, August 3, 2011

The big kitchen reveal...

As I mentioned a few posts ago, our new favorite color, comfort gray, ended up elsewhere in our house. It made its big splash in our kitchen. Here is the before shot of our "cookie cutter" kitchen...

Please excuse all the clutter...we were in full project mode at this point!!
 And here is the cabinet alcove with comfort gray paint...


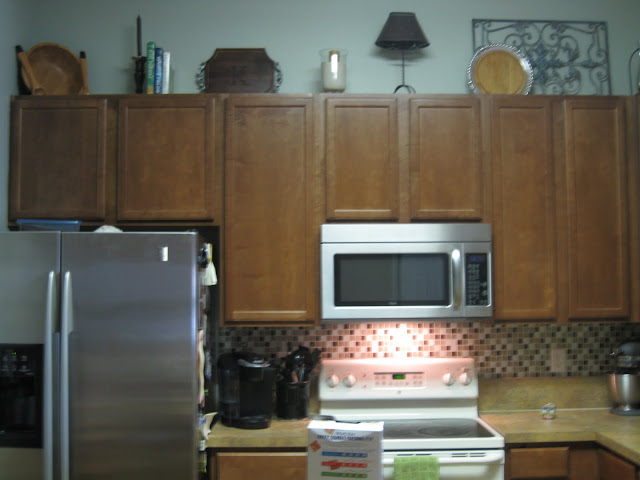
See how the color looks even different than it did in Walt's room? It is really such a versatile color. We decided to only paint the alcove around the cabinets to highlight the dark wood, and to avoid having to paint the entire kitchen, dining room, and hallway that are all connected. But we didn't stop there!! We decided to put up a tile back splash between the cabinets and the counter top! I found the tiles on clearance at home depot for only $4.00 per square foot!! Great deal!! Here's dad and I trying to figure out the placement (quite the tedious, and sometimes jimmy-rigged application).


My grandmother then beautifully decorated the tops of my cabinets, something I simply am not capable of doing. So, big thank you Mema!! And we finished grouting the tiles for this big reveal...


I think it looks A-mazing! I am so happy that it looks more like a custom kitchen and addresses all of my original complaints: too dark in the kitchen, ugly brown cabinets that blend into the wall color, and lack of anything special.

Buuuuuuttttt....we didn't stop there. Can we say OCD? I just can't stop until I have completed all the projects I have running through my head (as if I don't have an entire nursery to finish?!?). Remember these cabinets...


Well here's what they look like now....


So much better don't ya think? I have always loved exposed shelves, but never thought they were all that practical. One set of cabinets on the other hand...very doable. I am still contemplating painting the inside or doing some sort of pattern back there, but for now I am leaving them plain to see how I feel about them as time passes. 

And for all those inquiring minds, here is the price break down for the whole kitchen redo...

Paint for Alcove............already purchased for Walters' room
Tile...........................$56.00
Adhesive.....................$10.00
Grout.........................$10.00
Glass Cabinet Inserts.......$40.00
Decorations..................went shopping in my house, so free
Grand Total..................$126.00 (Not too shabby!!)


Tuesday, August 2, 2011

Project Nursery {Part One}

Let the fun begin!! We are finally implementing the design plan for Walt's nursery, starting with the paint and bedding. We decided on Sherwin Williams Comfort Gray for the walls. The pictures don't really do the color justice. It's a beautiful shade of green/gray/blue and changes color in the light. It definitely reads boyish without screaming "I'm a baby boy!!" I absolutely love the color choice and feel really lucky that we picked it, as it actually ended up elsewhere in the house....more details to come :)


The bedding actually looks great with the color too!! And though I am certain that the plush fabric of the bumpers will not be the absolute easiest with regards to clean-ability, I really love the soft feel and comfort it will bring to our little man.


A huge thanks to my dad for coming all the way to Green Cove Springs, Florida to paint for us!! The hubs is not a fan of painting, and my preggo belly + paint fumes don't really mix...so it was a HUGE help! Thanks dad!! We love all the stuff you did!!

So there you have it...part one complete. Many, Many more projects to come. Up next, the window treatments...stay tuned!!