Showing posts with label Home Rennovation and Decor. Show all posts

Wednesday, August 3, 2011

The big kitchen reveal...

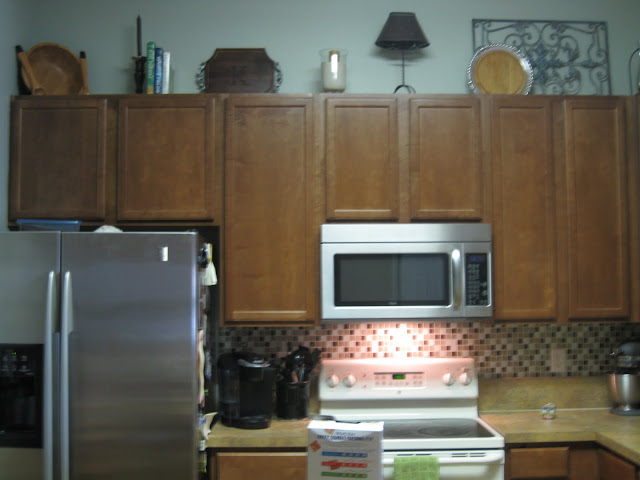
As I mentioned a few posts ago, our new favorite color, comfort gray, ended up elsewhere in our house. It made its big splash in our kitchen. Here is the before shot of our "cookie cutter" kitchen...

Please excuse all the clutter...we were in full project mode at this point!!
 And here is the cabinet alcove with comfort gray paint...


See how the color looks even different than it did in Walt's room? It is really such a versatile color. We decided to only paint the alcove around the cabinets to highlight the dark wood, and to avoid having to paint the entire kitchen, dining room, and hallway that are all connected. But we didn't stop there!! We decided to put up a tile back splash between the cabinets and the counter top! I found the tiles on clearance at home depot for only $4.00 per square foot!! Great deal!! Here's dad and I trying to figure out the placement (quite the tedious, and sometimes jimmy-rigged application).


My grandmother then beautifully decorated the tops of my cabinets, something I simply am not capable of doing. So, big thank you Mema!! And we finished grouting the tiles for this big reveal...


I think it looks A-mazing! I am so happy that it looks more like a custom kitchen and addresses all of my original complaints: too dark in the kitchen, ugly brown cabinets that blend into the wall color, and lack of anything special.

Buuuuuuttttt....we didn't stop there. Can we say OCD? I just can't stop until I have completed all the projects I have running through my head (as if I don't have an entire nursery to finish?!?). Remember these cabinets...


Well here's what they look like now....


So much better don't ya think? I have always loved exposed shelves, but never thought they were all that practical. One set of cabinets on the other hand...very doable. I am still contemplating painting the inside or doing some sort of pattern back there, but for now I am leaving them plain to see how I feel about them as time passes. 

And for all those inquiring minds, here is the price break down for the whole kitchen redo...

Paint for Alcove............already purchased for Walters' room
Tile...........................$56.00
Adhesive.....................$10.00
Grout.........................$10.00
Glass Cabinet Inserts.......$40.00
Decorations..................went shopping in my house, so free
Grand Total..................$126.00 (Not too shabby!!)


Monday, April 11, 2011

Ribbons and Bows...

After a very chaotic Christmas Holiday (yes, I know it's April, but I'm still recovering), I decided that I needed a way to organize all of my wrapping supplies which are quite abundant during that time of year. I am in charge every year of purchasing all of the grandchildren gifts from the amazing  Pegasus which results in approximately 50 gifts, 10 rolls of wrapping paper, a minimum of 3 rolls of tape, multiple pairs of lost scissors, and a very frazzled me. So I came up with this.....


Well actually I borrowed the plans from this website, with only a few modifications. The hubs did all the physical stuff and I painted. I just love having a place to organize all my wrapping stuff. And it sits so nicely in my crafting corner of Adam's office which I stole borrowed...


I store all of my fabrics, scrap book supplies, computer stuff, paints, office supplies, my bag full of gift bags (yes, I save them), and any other general crafting stuff! What ya think?

Tuesday, March 8, 2011

A Little Face Lift...

For 10 months now, I have been looking at this eye sore...


 And a close up...


Isn't she pretty? I think NOT! The hubs and I finally decided to give our front flower bed a major overhaul. Through lots of potting soil, mulch, and a few hours at our local nursery, we ended up with a lovely and welcoming entrance to casa Kizziah. See for yourself...


I must confess I did very little of the work. I mostly just bossed him around supervised the project, while Adam did all of the manual labor. I'm so lucky, right? We decided to go with Aztec grass along the front, Japanese dwarf mock orange bushes staggered in the middle, and finally Red ties along the back. I love all the contrasting colors and how it frames the front of the house without covering up the front windows and seating area. I also love that all of these plants are year-round bloomers and don't need to be re-planted every year or covered in the winter. Major plus for this girl with absolutely no green thumb! A close up shot....


So there you have it...some brand new landscaping. Here's to hoping I'll be a little more diligent about blog posting in March!!

Wednesday, January 12, 2011

The New Girl In Town...

So it's done! Complete! Terminado! Hallelujah! My gently used brand new china hutch is in the house, painted, stocked with goodies, and I. Am. So. Relieved... and so in love. This was probably my most ambitious undertaking to date, which was only compounded by the fact that I absolutely, positively, HAD to have it complete before Christmas!! (sorry for the late posting, I've been a little lazy) This was a Craig's List find, and it definitely started a little rough...


Ugly oak, broken glass, and a busted back....but it was a GREAT deal, and my thrifty self knew it could be transformed. I guess beauty really is in the eye of the beholder :) 

After A LOT of sanding, priming, and about 10 cans of spray paint, she's a new woman!


I painted the inside of the cabinets a beautiful shade of blue to highlight all of my white dishes. I also removed the side glass doors and replaced it with chicken wire that was spray painted oil rubbed bronze along with the original hardware. Then with some light distressing and some glaze, she took on a whole new life. 


So what do you all think? I am so happy to have a place to store all of my beautiful wedding presents! Here is one last view in the now completed (well, minus the horrendous light fixture) dining room!


Close-up of the tablescape...


And this little cutie hiding in the corner. Not really sure what I'm going to do with her, but I luhv her!!


I'll share more on the updated curtains soon! Have a fabulous hump day!

Linking to Cassie at Primitive and Proper!!

Friday, November 19, 2010

The Headboard Tutorial

So I ran out of time to post the tutorial for our headboard yesterday, so without further ado, the painstaking tale of really how not to create a headboard/learn as you go building! We made lots of mistakes which I will highlight for you as to avoid our pain troubles. 

Supply List:
  • 1 piece of 1/2 inch plywood cut to your desired length. For a king we did 78 inches
  • 3, 4 foot boards (for the legs)
  • Enough foam to cover the plywood (can be pieced together)
  • 1 sheet of batting long enough and wide enough to cover your board
  • Fabric of your choosing (with about 6 inches to spare on each side)
  • Nail head trim if you choose
  • 3, 1x4 boards (1/2 thick) if you choose to do trim
  • Staple Gun
  • Screws and Drill
  • Hammer
Process:

{1} Attach your legs (4 inch boards) to your plywood using screws. We screwed through the front of the board so if there was any excess we could hammer them flat to the back and the front surface would remain flat. We attached ours right at the edge of the board to line up with our bed frame, and also because we were not worried about seeing the legs as we have 2 night side tables on either side of our bed that will be there permanently to hoard our junk and the hubby's fighter pilot mask.


{2} Cover your plywood with foam. I used cheap 1 inch foam from Wal-mart. Trust me, this stuff can get expensive, so you wanna try to use a coupon. Don't worry if you can't find foam wide enough (most likely you won't be able too), it can be pieced together and never seen. Using spray adhesive, just work in pieces until your entire piece is covered. You can also use hot glue on the edges if they won't stay down.


{3} Attempt to hammer in 1 decorative nail head to see if it will stay.
{4} Find out that it will not stay, and devise plan B.
{5} Cut out approximately 4 inches of the foam around the top and sides and drill in 1/4 boards to create a "border" that will allow the nail head trim to be hammered into.

Here it is with the "cut outs"

Here it is with the attached boards.
{6} Cover the whole thing with high rise batting by simply stapling to the back side of the board. Make sure you actually read the package and buy a piece that is wide enough to fit your enormous headboard. Otherwise you will become very frustrated, have a minor breakdown to your husband, and then devise a plan to piece it together and hot glue the seam together. It actually turned out not to matter at all, but I was very worried you would see the seam down the middle.


{7}Yell at your dog for constantly sleeping, drooling, stepping on your headboard project. 

{8} Cover your headboard with the fabric of your choosing. We chose a velvety gray fabric that was on sale at JoAnne's, but anything will work. Just make sure it's "sturdy" enough to be able to pull tight. I recommend stapling the very center of each side first, then continue pulling tight and go around the edges. Since we opted to attach our headboard directly to our bed frame instead of the wall (which would be impossible as our bed is front of a window, but we also didn't want to leave huge holes in the wall) you will have to sort of cut slits in the bottom of the fabric to go around the legs. Don't worry, this doesn't have to be perfect...No one will ever see it, it's behind your mattress. 


{9} Start nailing individual nail heads to your "raised" wood border in a pattern you like. Get about 1 foot done and realize that it will be absolutely impossible to keep them in a straight line even with precise measuring. Pitch another fit because "you went through all this work and it won't even work now", pout, etc. Then devise plan C. 

{10} Get online and order a roll of nail head trim that only requires nailing every 5th hole and wait patiently for it to arrive. 

{11} Decide on a pattern and begin nailing into the wood. You will want to use a mallet (a regular hammer covered in a sock) so as to not damage your nail head trim.

{12} Slice your fingers open multiple times by stupidly not wearing work gloves while dealing with a roll of METAL!!

{13} Apply work gloves and finish your project. 

{14} Admire your hard work! After it all it did take sweat, tears, and even blood!!


I chose a double row of nail head trim spaced exactly 3 inches apart

{15} Wait for your husband to get home to bolt your head board through the holes in the bed frame. We simply pre-drilled holes into the legs, stuck a long screw through it and tightened a nut from the other side. It is incredibly sturdy.


{16} Fall in love with your new head board and enjoy many nights without neck cramping while trying to enjoy your evening t.v. line-up!

Please let me know if you have any questions and send pics if you attempt this yourself! It's so worth all the work, and really I have walked before you, so should be easy breezy!!

Have a happy weekend!! Up next a Birthday calendar, a Craigslist score, and some hair beutification!!

Monday, November 1, 2010

Trick Or Treat

       Have I told you that I love Halloween? We had such a blast last night (the real Halloween)! Can you believe that some people actually change the day of trick-or-treating? Well not here in J-ville! the 31st equals trick-or-treating even if it is a school night! 

Adam and I bought $35.00 worth of candy and were wiped out in literally an hour. It was A-mazing. And that was with me rationing it out at 2 pieces per kid. Geez!! There was even a Halloween train. Like literally a train. Well a mule with a bunch of trailers attached carrying what seemed like an army of dressed up kiddos, but still a train of children. 

     By the end of the night we were hiding in our living room with all the lights out, trying to ignore the constant door bell ringing and knocking. Apparently there were some hungry kiddos who Really wanted some candy :) He he! Our favorite costume of the night had to be a teenage mutant ninja turtle....
 I didn't even know kids were still into them, but I was obsessed as a kid, and I loved seeing a little bit of retro in the Halloween costume department. 

Our front porch was decorated with a combination of real and fake pumpkins in a semi-monogrammed theme. I took some "carvable" fake pumpkins that I got for $10.00 at the Hobby Lobby, painted them white, and then painted one with our initials shaped like bugs (Idea from Young House Love) and glued some trim to the other ones to end up with a cute little black and white pumpkin spread. Yes, I know you can actually buy white pumpkins, but I wanted something I could use every year, so I went the fake route. Here is the result...


 For our real pumpkins I got lazy creative and decided to use my power tools to help speed along the pumpkin carving process. Here's I am in action...

making my "power tool" face as instructed by the hubs :) Oh and pleeeeeeaaaaase excuse the dirty kitchen :(


Here is the result of my damage drilling...


 And here it is all together on our front porch with some hay bails...


 Very festive don't ya think?!? Oh and I couldn't leave you without a shot of my "candy" man...


I think he had as much fun as the kiddos. Who am I kidding...I definitely had the most fun! Overall we had a really fun weekend full of tailgating and candy giving, minus the minor mishap that was the Georgia game :( My poor little dawgies didn't end up on top. More to come on tailgating and outfit making...

Hope you all had a very happy Halloween too!!

Wednesday, October 20, 2010

Sew What ya Think?

     God I love a corny title :) It's my guilty pleasure. I manage to spend a crazy small amount of time dreaming up such titles just for your reading pleasure. Today I bring to you a labor of love, my antique sewing table redo. I found this little beauty at a local yard sale a few Fridays ago. Must be a Florida thing, but people actually start yard sales on Friday here?!? Anyway, I saw it and decided I absolutely could not live without it, despite having NO idea where it would live in my house. But with a price tag of $4.00, I simply couldn't resist. I guess beauty is in the eye of the beholder because here is the horribly frightening before shot...


Not so bad from afar, but take a look at the up-close and personal shots...

Chipping front cabinet door = pain in the butt

An even worse rear-end!!
     Well I rolled up my sleeves and got to work. I started by sanding the entire piece with my birthday sander :) Then I filled in the missing parts with wood filler. Let that dry and sanded the whole thing again. VERY time consuming, but it was looking better already.

     I unfortunately forgot to take any during pictures, but picture, primer (I used killz in the spray can) and then 1 coats of Bejamin Moore's Caliente which I painted on with a high quality brush.  I think used Benjamin Moore's paint extender/ miracle in a bottle mixed with the red paint for the final coat = no brush marks and really smooth finish.
     I really liked the color, but it still needed a little something more. I was going for the old barn look, so I decided to distress some of the edges with 220 grit sand paper, then applied a dark brown glaze which I brushed on with a foam brush and wiped off with an old t-shirt.
     I absolutely love how it turned out. Cue major picture overload! I loved it so much, I couldn't resist taking a million few pictures to show you all...


 And one last look at my cute little rustic table...

P.S. that's my twin sister and I hugging when we were about 4 years old! Cute huh?

     It is now sitting in my guest bedroom and functioning as a little nook to hold a lamp and pictures. After I finished, I decided to do a little research on my sewing machine. Turns out it was built in 1936, right before World War II. Pretty amazing for 4 smackaroos!! Oh, and it still works, just needs a new power cord! Overall I am rather pleased with myself for completing my second ever furniture renovation!

Hope you're having a glorious hump day!!

I'm linking to Primitive and Proper!